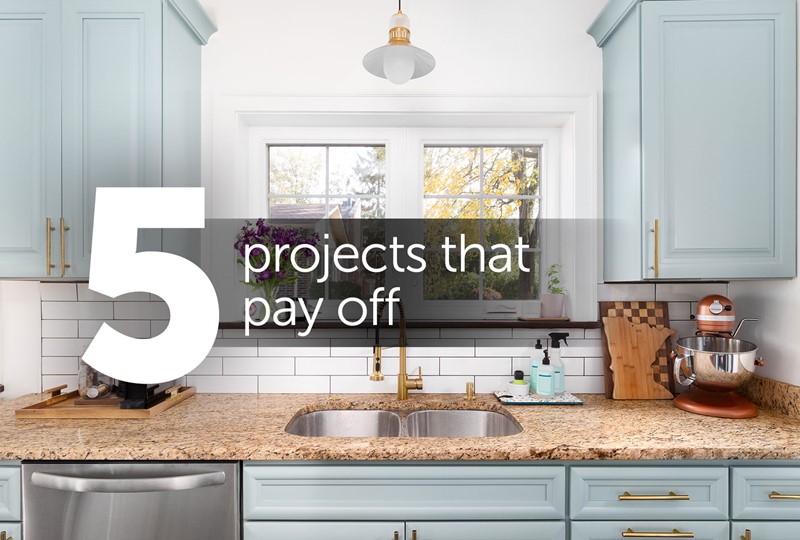
Five home improvements with the best ROI

/media/3897/5-projects-may-2024.jpg

Key insights:

  • Historically, home sellers invested in improvement projects before listing to generate more interest in their property.
  • Today’s sellers hold a keen advantage in the market, so they should be sure to update only what is necessary before listing their home for sale.
  • Data shows that some of the least expensive projects — such as a new garage door or a new front door — can have the greatest impact on a sale.

You’ve likely seen the headlines: Today’s sellers are getting 99.3% of their asking price in the past 12 months, which means that they hold a big advantage in today’s market. With this news, you may not plan to update anything on your property before you list it for sale. If your home is in the right neighborhood and in good condition, this may be just fine! But if your home is outdated, you may get an even higher bid if you give it a little polish before selling.

But which projects can have the biggest impact for sellers? Shouldn’t some updates be reserved for homeowners who plan to stay in their homes and enjoy them for a few years?

These are the questions we asked as we dove into the 2023 Cost vs. Value Report (www.costvsvalue.com). This exhaustive report details the cost and value of home improvement projects across the country, and they even break the data out by region and city.

Based on that report, here are the projects Twin Cities homeowners should take on if they want to recoup the most on their initial investment.

1. Fiberglass grand entrance
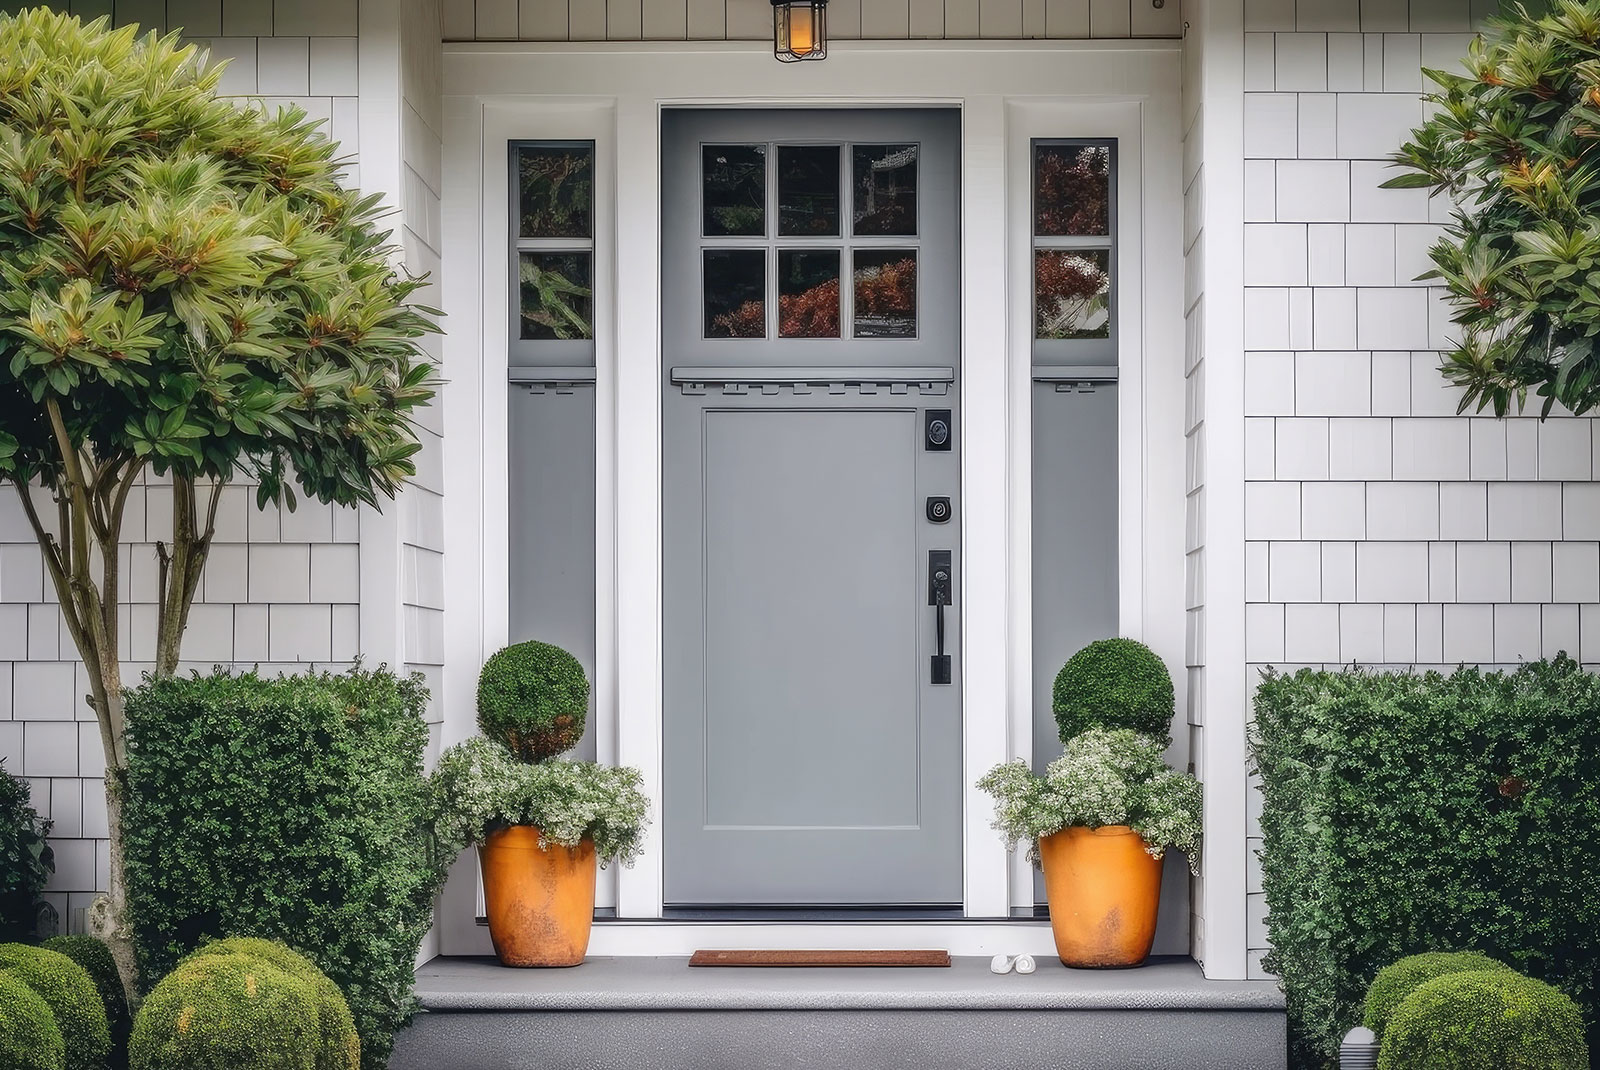
Grand entrance

Cost: $10,823

Resale value: $5,238

Cost recouped: 97.5%

Replacing a standard entry door with a more grand entrance can add a lot of curb appeal to your property. Fiberglass’ unique material keeps it energy-efficient and durable while being highly customizable, even able to mimic wood grain.

Start by removing the standard entry door and then cut and reframe the door opening for a larger door with dual sidelights. Customize the entrance with upscale finishes like color, threshold, lockset and decorative half-glass with sidelights.

An upscale fiberglass entry adds a big “wow” and should only take a day to complete.

2. HVAC conversion to electric

HVAC

Cost: $18,328

Resale value: $17,615

Cost recouped: 96.1%

If your system is in need of an update, converting to an electric HVAC operating system may be a sound investment.

While not the most glamorous home update, a new HVAC system that runs on electric instead of gas can offer a big return when it comes to home resale. An electric HVAC system improves air quality and lowers energy bills over time. Switching to an electrically-powered system provides greater safety and peace of mind than their gas-powered counterparts, which produce carbon monoxide. They also have a longer life span and are energy-efficient while operating quietly and providing lower maintenance costs.

In addition to having lower upfront costs to install, tax incentives and rebates may help lower your initial bills.

3. Manufactured stone veneer
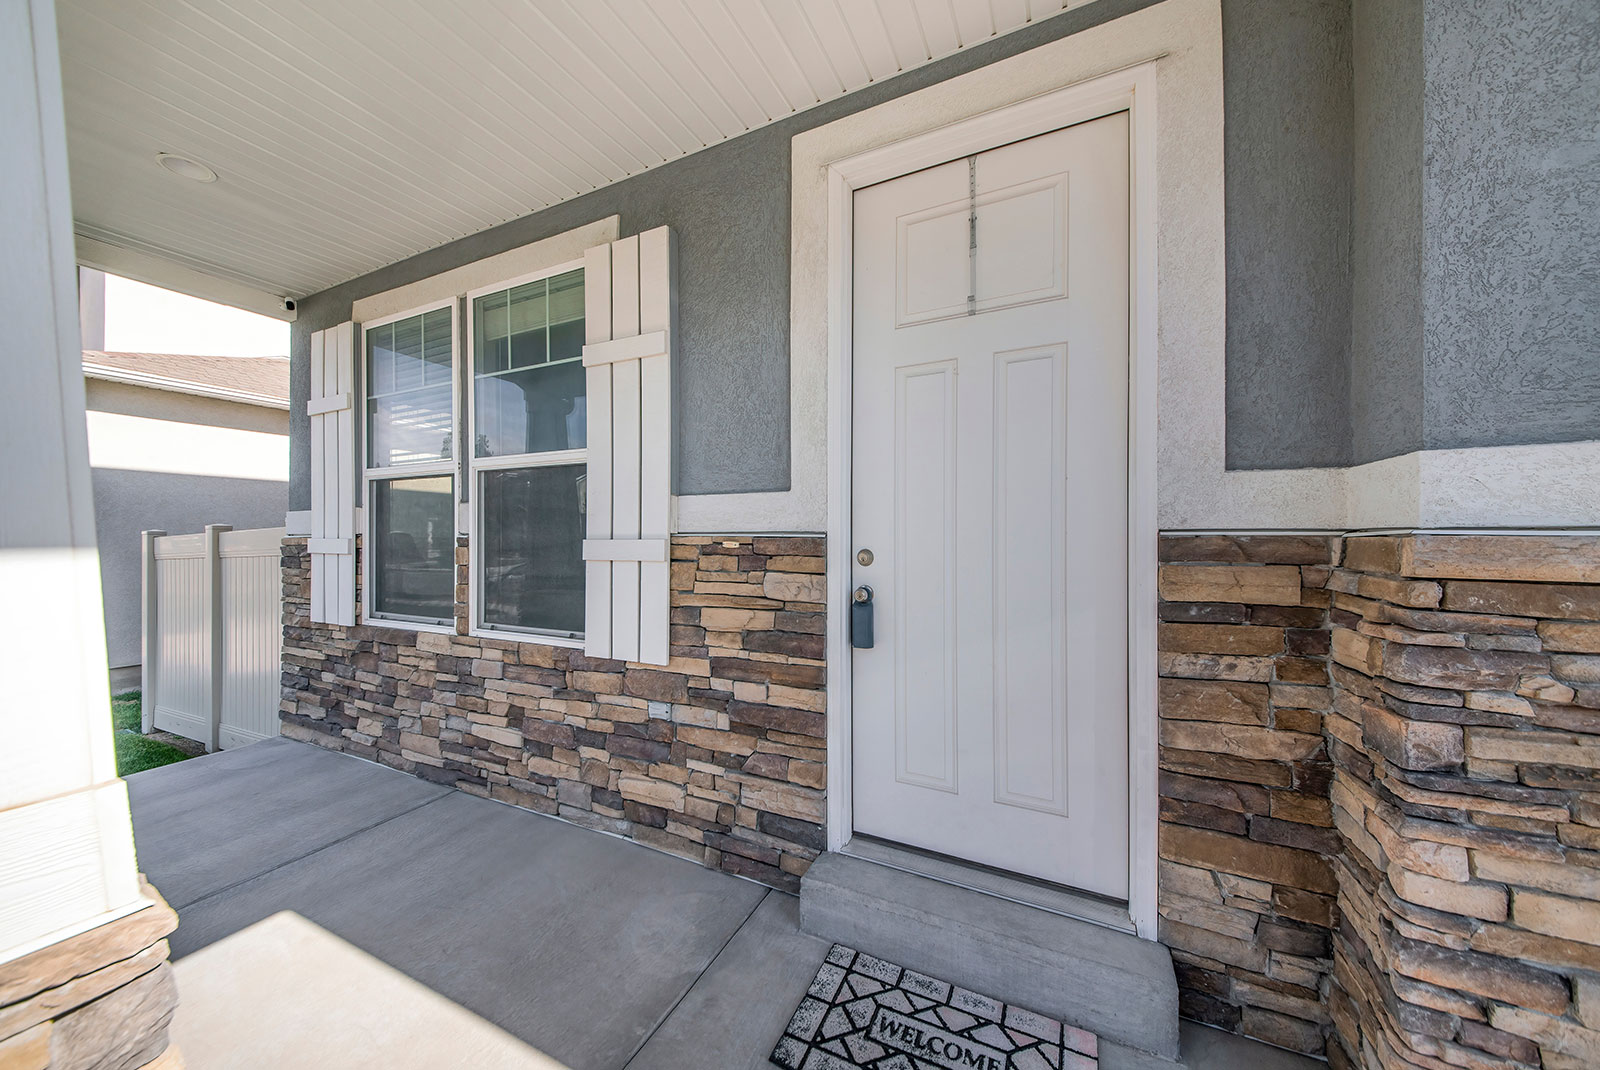
Stone veneer

Cost: $11,463

Resale value: $10,582

Cost recouped: 92.3%

If you’ve seen new construction homes over the last few years, you know that partial stone veneers are all the rage. Current homeowners can also freshen up an aging exterior by adding a stone veneer accent to the bottom third of their home.

To complete this project, you’ll first remove the bottom third of siding from the street-facing side of your home exterior then replace this area with a stone veneer, including sills, 40 corners, an address block and a detailed faux-stone archway around the front door. The installation also includes protection against water damage and corrosion.

You’ll be amazed at how this easy stone addition gives your home’s exterior a modern facelift!

4. Siding replacement (vinyl)
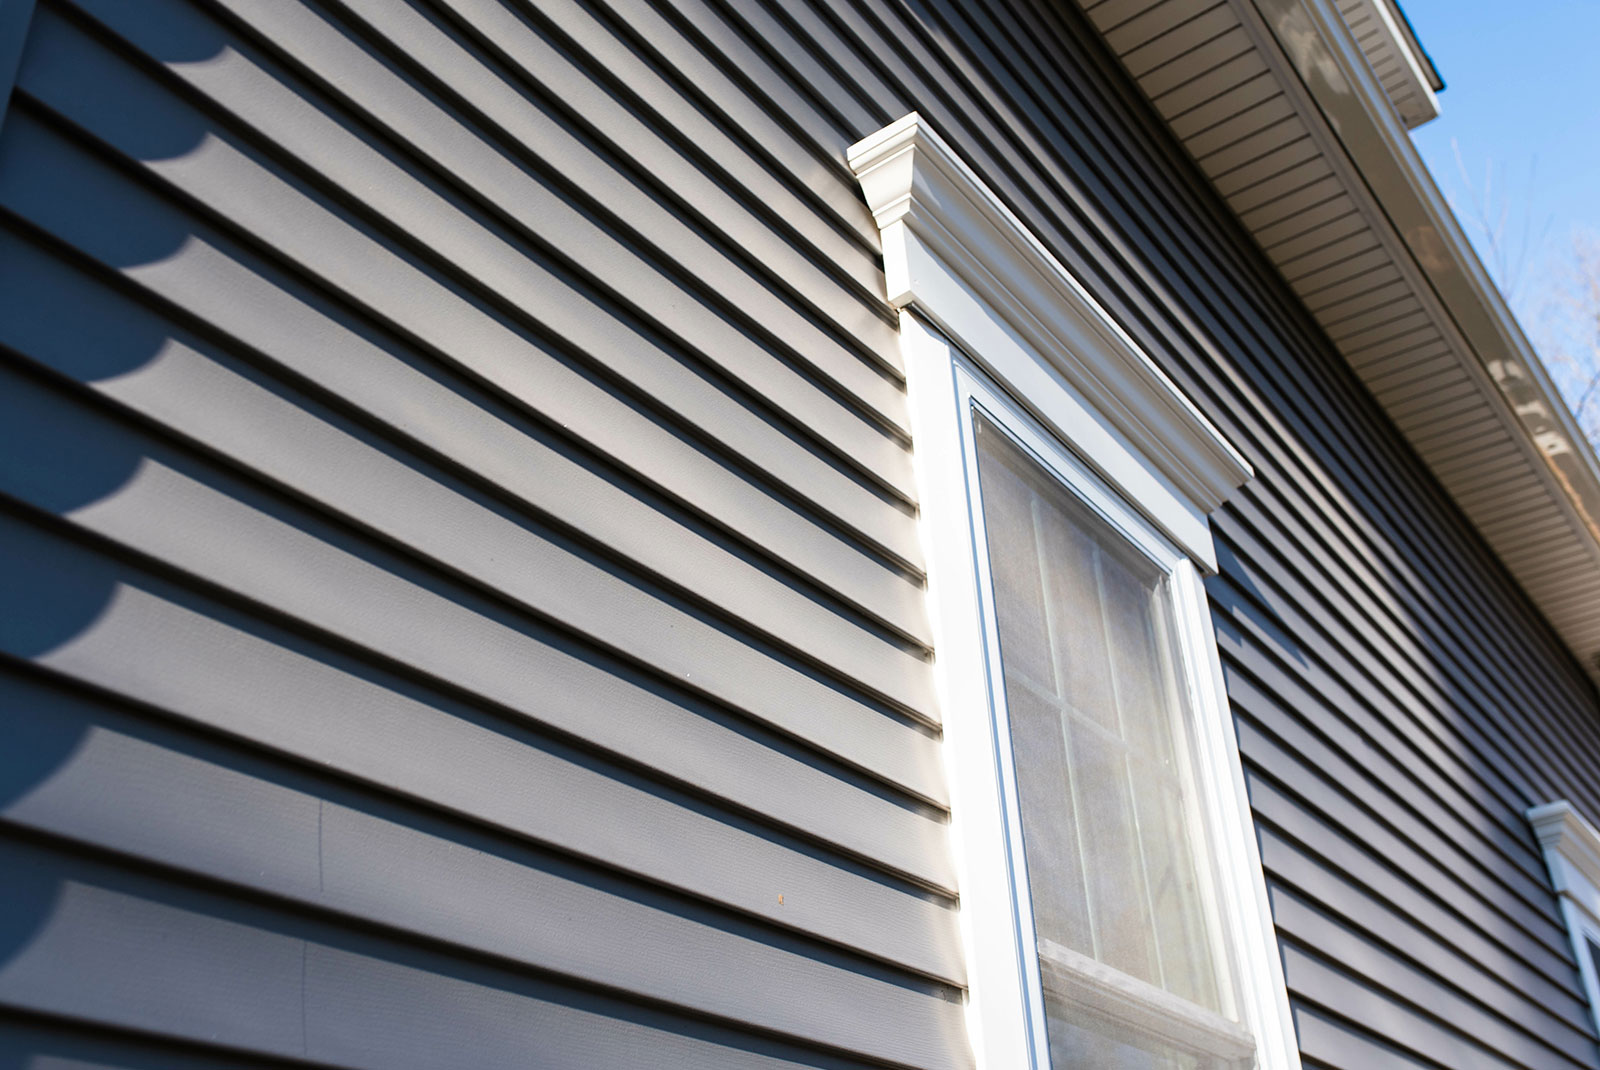
Vinyl siding

Cost: $17,813

Resale value: $15,950

Cost recouped: 89.5%

New siding can be a big selling point to potential buyers. It not only aesthetically updates a home and adds curb appeal, but when using vinyl, can add additional benefits like preventing pests and adding insulation for more energy efficiency.

Installing vinyl can mean years of maintenance-free living for owners. Vinyl is durable, low-maintenance and comes in a wide variety of colors and textures to best showcase a home.

As a benefit to sellers, it’s also cost-effective and easy to install. Note that not all vinyl siding is the same, and you’ll want to pay close attention to creating a water-resistant barrier.

5. Minor, mid-range kitchen remodel
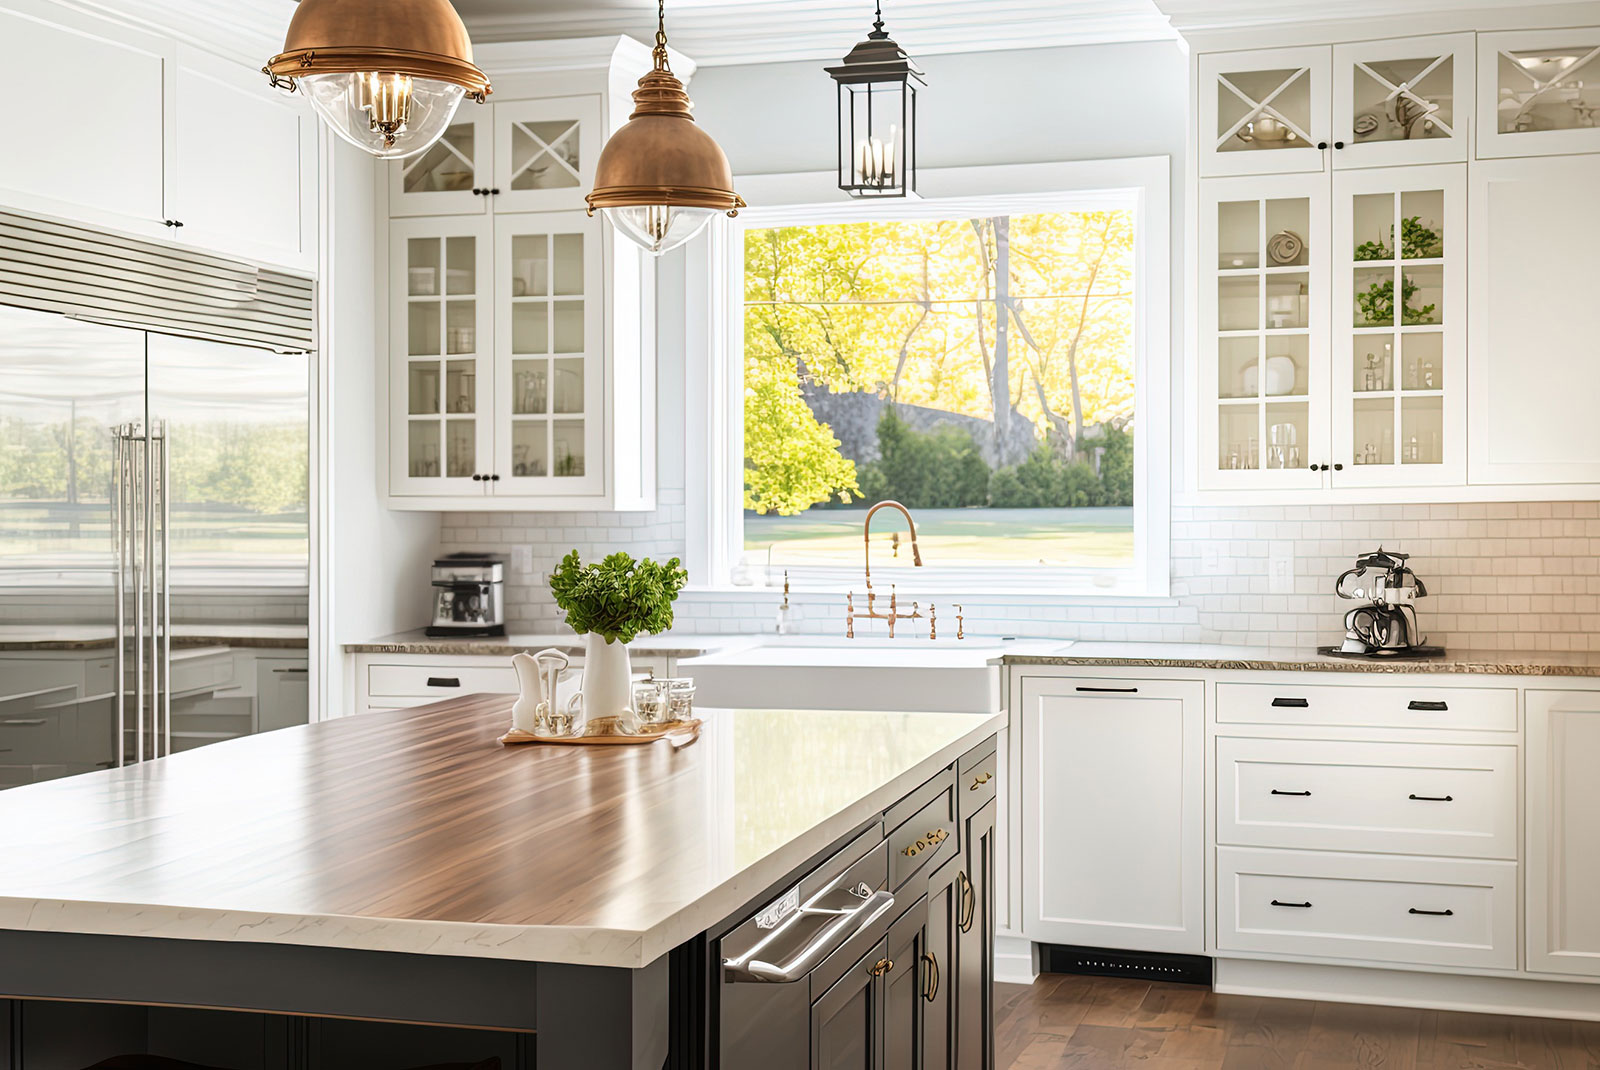
Remodeled kitchen

Cost: $27,009

Resale value: $22,784

Cost recouped: 84.4%

A modest kitchen upgrade can better maximize space, increase accessibility and provide enough of a cosmetic improvement to bring a dated kitchen back to life.

Replacing a number of key appliances, cabinet/drawer faces and hardware, along with cost-effective flooring and counters and a fresh coat of paint on walls, trim and ceiling can offer buyers a blank slate that showcases the functionality of a crucial space.

Voila! A not-too-expensive update that saves you the cost of all new cabinetry or high-end finishes.

Want more info on the ROI of home projects?

We’ve detailed the five projects with the highest return on investment, but the 2023 Cost vs. Value Report also shared the five projects with the lowest ROI in the Twin Cities. If you plan to move soon, you may want to avoid adding an owner’s suite or a brand-new bathroom.

Here are the home improvement projects with the lowest ROI locally:

  • Upscale owner’s suite addition (22.8% recouped from budget of $338,195)
  • Upscale bathroom addition (25.6% of $109,772)
  • Mid-range bathroom addition (27.2% of $60,592)
  • Mid-range owner’s suite addition (30.0% of $163,887)
  • Upscale major kitchen remodel (31.1% of $152,918)

Wondering what other remodeling projects were reviewed for the Minneapolis region? Check out the complete 2023 Cost vs. Value Report for our area.

Get expert guidance before you sell

Keep in mind that it may be smartest to take on higher-cost, lower-ROI projects only if you plan to be in the home for a few more years. After all, your own enjoyment of these projects can certainly count as a return on your investment!

However, if your updates are solely intended to sell your home faster or for more money, let’s talk before you begin renovations. Reach out for advice on the most cost-effective, impactful changes you can make to your property.

Complete data from the 2023 Cost vs. Value Report can be downloaded free at www.costvsvalue.com, Distributed by Remodeling by JLC, ©2024 Zonda Media, a Delaware corporation.

Four questions to ask when buying a condo or townhouse

/media/3896/four-q-condos-may-2024.jpg

Key Insights

  • Carefully review HOA fees and how the budget is spent when considering a townhouse or condo.
  • Ask for a copy of HOA rules and regulations so you can fully understand the benefits and deterrents of a space.
  • Make sure your unit is adequately soundproof before making an offer.
  • Consider parking and additional storage spaces.

Whether you’re a first-time buyer hoping to buy a starter home, or a downsizer looking for a fresh start, a condo or townhouse could be just what you need. Here are four questions you can ask as you tour condos and townhouses with your REALTOR®.

1. What are the HOA fees? How is the budget spent?

Homeowners associations (HOA) can be a plus for condo and townhouse owners who don’t want to arrange for trash pick-up or snow removal. Different HOAs cover different items—some HOA fees might include water and sewage, while others expect dwellers to cover that cost separately. It’s important to review what the HOA costs cover so you can budget appropriately. Remember, HOA fees are technically a part of your housing cost, and they should be considered when you are determining your budget.

When inquiring about your HOA fees, be sure to ask how the budget is allocated, who controls the purse strings, and how much is currently available in cash reserves. If the building is 10 to 20 years old, for example, experts recommend that 25-30% of the incoming fees be earmarked for future major repairs. It’d also be wise to ask about past special assessments and if there are any on the horizon. Be sure to look at the insurance policy and see if the coverage is robust enough for your area.

2. What are the HOA rules and regulations, and the perks or community resources?

Every homeowners association is different, so be sure to ask if the townhouse or condo:

  • Allows pets or has size and breed restrictions
  • Has regulations about upkeep of private property (including balconies)
  • Requires your unit to be owner-occupied
  • Charges fines—and what fines are most common
  • Has quiet hours or noise restrictions
  • Offers security measures (security personnel, cameras, entry fobs, lighting, etc.)

Much of this information can be found in the HOA rules and regulations, and most management companies will give you a copy to review if you ask. If you can, ask about who manages the property and how accessible they are to residents.

On the other hand, condos and townhomes can have plenty of perks. Ask if they have:

  • A pool, Jacuzzi or sauna
  • Tennis courts or a community gym
  • Indoor or outdoor party rooms
  • A community-gardening area
  • Walking paths or outdoor space

3. What is the parking and storage availability?

While almost all condos (especially complexes) and townhouses offer parking, asking if you get a complimentary parking spot or if you’ll have to pay for parking is important. Be sure to check out the parking in person and see how much space is allotted. A townhouse garage may say it fits two cars but realistically cannot accommodate two SUVs. For condos, the difference between covered parking and underground parking is a game-changer when winter rolls around. Plus, a separate building may mean additional property taxes.

For those with multiple vehicles or who like to entertain, you may want to consider what the extra parking is like. Are there plenty of spaces? Do you need a permit to park in that area? Are there restrictions when it snows or on trash days?

You should also consider any larger items you have, like bicycles, skis, luggage, camping equipment and more. Your parking space may accommodate some extra items, but it’s good to ask if the condo or townhouse comes with a private storage space and be sure to check out the storage in person to see if it matches your needs.

4. What’s the community like?

In condo and townhouse living, getting along with your neighbors can be important. With closer quarters and community-shared spaces, you could be seeing (and hearing) a lot of them.

First, check if the unit has been soundproofed. This may seem silly, but one of the top complaints of condo and townhouse owners is that they can hear their neighbors’ comings, goings and everything in between. Be sure to inquire about any soundproofing that has been done to the space and consider stopping by at different times of the day or week to get a feel for how sound travels and what the “busy” times are (for instance, if you work nights, a community with heavy foot traffic in the morning might not be the best fit).

Consider the amount of privacy you’ll have. Ask questions like:

  • Are patios/balconies blocked off from your neighbors?
  • Are there multiple elevators and entrances?
  • Are common spaces heavily used?

Depending on the amount of privacy the space has, you might want to pay attention to the lifestyle of your neighbors and see if it matches your own.

Ready for a condo or townhouse?

The questions above are just a few of the important factors you should consider when buying a condo or townhouse, but a seasoned REALTOR can help you fully understand all the advantages and disadvantages of communal living. Learn more about condos and townhouses for sale or reach out today for help on the path to homeownership.

What is an appraisal, and how can sellers “pass” it?

/media/3895/appraisal-worthy-may-2024.jpg

Key Insights

  • An appraisal is an evaluation of a property's value that is done to ensure that the home justifies the loan amount.
  • Appraisals are done by an appraiser, who generally does an in-person inspection and notes amenities and the state of the home, finds relevant comps and evaluates neighborhood statistics to determine a home’s value.
  • A seller and their agent can help the process go smoothly by compiling all relevant information and getting the home in tip-top shape.
  • If a home appraises as expected, you go to the closing table. If it doesn’t, you can ask for a reconsideration.

Getting an offer accepted in today's competitive market can be exhilarating for both buyers and sellers. But an agreement between these two parties is only part of a longer process. The home also needs to appraise at the agreed-upon sales price so the lender can justify the loan amount. So how does this process work and what influences it? If you're selling your home, here are insights you can use to get a fair, informed appraisal for your property.

What does an appraiser do?

In short, an appraiser determines the current value of a property. They generally do this by performing a walk-through of the interior and exterior of the property and making note of any amenities such as a finished basement or swimming pool. They will also note health and safety code violations or other areas of concern. Most appraisers will utilize comparable home data (often referred to as comps) of nearby recent sales and neighborhood statistics to help determine a home's value.

Understanding an appraiser’s work style

Since appraisers are independent contractors (hired by the lender and typically billed back to the buyer), it's important to understand that they have their own preferences and work styles. While they are on your property, it’s essential to allow them one to two hours to complete the inspection without interruption. However, there are things you can do to make the appraiser's job easier — and help your home get an accurate valuation.

How can the seller help?

  • Make sure all utilities are on.
  • Ensure spaces and mechanicals are clean, functioning and free of debris.
  • Replace burned-out lights and make needed repairs.
  • Make sure crawl spaces, attics and outbuildings are accessible.
  • Provide your agent’s contact information early on. (The appraiser typically expects to speak with the listing agent.)

How can your REALTOR® help?

Your REALTOR can communicate relevant information to the appraiser and help make the process go smoothly. Here are a few ways your agent will assist:

  • Report upgrades and the dates they occurred.
  • Tell the story of how you arrived at the anticipated closing price. For example, explain if the property attracted multiple offers.
  • Provide value trends, including closed comps, recent transactions and neighborhood data.

Before the appraiser leaves, you or your REALTOR may ask whether there are any needed repairs or known concerns but understand that the appraiser may choose not to share this information with you.

What happens if the home appraises?

Hooray, your property appraised at the sales price! All systems go and you’re on your way to the closing table. Now the buyer's financial and credit history will likely be verified, the lender will likely approve the home mortgage loan and the loan package will be submitted to the title company to prepare the documents for closing.

What happens if the home doesn’t appraise?

If a property appraises under the sales price, your REALTOR can request a reconsideration of value. In this case, your agent and lender would guide the process, listing factors that should warrant adjustments, such as additional comps or alternate data. It’s possible that the appraisal could be reconsidered and you could still close at the price agreed upon by you and the buyer.

Ready to sell?

If you haven't yet put your home on the market or need help preparing your home to sell, reach out today and get in touch with an experienced professional who can assist you throughout the selling (or buying!) journey.

Five expert tips for negotiating a home purchase

/media/3889/5-expert-tips-april-2024.jpg

Key Insights

  • It’s important to know what the market conditions are and what (if any) leverage you have when buying a home.
  • Discuss how high you’re willing to go before making an offer so you can quickly respond to counteroffers.
  • Carefully read the terms of purchase and determine what terms are most important to you.
  • Work with a REALTOR who understands the market, language and negotiation techniques to protect your interests and help you get the best terms.

You know it’s important to hire an expert negotiator when buying a home, but did you know that by doing your research, you can also keep the sale on track? Here are five insights you can use when negotiating a home purchase.

1. Determine leverage

Sometimes, leverage is based on local market conditions. When there is a shortage of homes for sale (as there is now in many areas), sellers may expect to get their listed price because buyers are competing over a small pool of homes for sale. When homes are abundant on the market, buyers hold the advantage and may be able to secure their desired property for less..

Of course, there are other factors that can give a buyer or seller an advantage. Buyers may benefit if sellers need a swift path to closing or can’t afford their monthly mortgage payments. And even in a buyers’ market, in-demand homes in trendy neighborhoods may fetch multiple bids and a higher sales price. If you find a home you love and aren’t sure who has the leverage, talk with your REALTOR® for insights and context.

2. Leverage comparable sales

Your REALTOR will have access to comparable sales, often called “comps,” in your desired neighborhood. Comps will show you the average sales price and time on the market of similar homes. These numbers can be invaluable as you determine your bidding and negotiation strategy.

Think of it this way: If you were bartering for a $50 lamp at a flea market, you might have no idea what to make as a starting offer. However, if you knew that a friend had bought a similar lamp from the same vendor for $45 last week, you could safely assume that a $45 offer would be reasonable. This same idea can be applied on a grand scale when putting together an initial bid based on comps in your desired area.

3. Respond immediately to counteroffers

If a seller responds to your offer with a counteroffer, it’s important to work with your REALTOR to respond to it quickly. In fact, you may even want to discuss how high you’ll go in a counter before you make your initial offer. That way, if a counteroffer comes in, your agent can verify that the number you previously discussed still holds and move the negotiation forward quickly.

4. Understand the terms of purchase

When your offer is accepted, you and your REALTOR will review the purchase agreement to see if you’ll agree to the seller’s terms. Some sellers may add special clauses saying that the sale does not include a prized chandelier or brand-new stacking washer and dryer units, and you’ll have to determine if these terms are deal-breakers. They could also include other terms, such as contingencies, proposed closing dates, provisions on inspections and more.

Remember, the party with leverage may not see the need to budge, so it’s important to enter negotiations with open eyes. Once the purchase agreement has been drawn up, it’s up to the buyer and their REALTOR to determine what’s worth fighting for and what can be accepted.

5. Never cut out the “middle man”

Keep in mind that while it may be tempting to directly negotiate terms with the seller, you should avoid this path. First, negotiations are about staying closely guarded without appearing too closed off, and REALTORS know how to expertly navigate these conversations. If you appear too eager to settle a term, you may give up any leverage you have. Plus, by calling the seller directly, you may be cutting out your expert while the seller is still consulting with their listing agent to get the best terms.

Last, the language of real estate contracts is complicated and requires the eye and experience of a professional. By negotiating a contract verbally (and outside the terms of the listing agreement), you may not end up with a contract that reflects your handshake deal. Your REALTOR will ensure everything is legally sound and in writing.

Start your home search

Before you can begin bidding or negotiating, reach out and get the help of a local expert who specializes in getting to the closing table.

Perennial splitting 101

/media/3890/splitting-perennials-april-2024.jpg

Key Insights

  • Perennial plants come back year after year with little care.
  • Perennials can grow to be too large and need to have their roots split so the original plant and its offshoots can thrive.
  • Splitting plants is very simple and can be done at almost any time.
  • If you run out of garden space, consider gifting your perennial offshoots for others to enjoy.

One of the best parts of spring is watching all the new growth and greenery sprout up in your yard and neighborhood. If you have perennials in your landscape, you can enjoy these blooms and foliage with minimal effort.

However, if you haven’t visited your garden in a while, you might want to stop by and see if your perennial plants could benefit from splitting before the vegetation becomes unwieldy. Here’s a quick course on what plant splitting is, when you should do it and how it’s done.

Perennials are low-maintenance plants that may need to be split

Perennials are plants that are planted once and continue to grow or flower for multiple years. Perennials are great because they grow well, are sturdy against weather and disease and are a low-maintenance way to beautify your landscape (especially if you use mulch).

While there are plenty of beautiful perennial flowers, homeowners can also benefit from perennial shrubs that may add privacy and greenery with minimal effort. Because they are so low maintenance, a perennial garden is a good place to start for beginner gardeners who want to work their way up to fruit and vegetable gardening.

Here are a few perennial plants that grow well in Minnesota and northern Wisconsin (zones 3-5) you might be familiar with:

  • Herbaceous perennials: Hosta, peony, geranium, rudbeckia, purple coneflower, daylily, yarrow, chrysanthemums, salvia
  • Clump-forming evergreen perennials: Heuchera, salvia, phlox, fern
  • Spreading shrubs: Lilac, forsythia, dogwood, hydrangea
  • Underground rhizomes: Bearded iris, bugleweed, mint, aster

Sometimes, mature perennial plants can get so big that they start competing with other plants for soil nutrients and sunlight. Without adequate nutrition, these plants will start diminishing or stop flowering. Overgrown plants can reduce your curb appeal, and pruning them back or splitting the plant is an easy, cost-effective way to make your landscaping more aesthetically pleasing.

Plant splitting helps your garden thrive

Plant splitting—also known as dividing —is the act of taking the root of a mature plant and breaking it into several plants. While perennials have different root systems, the one you may be most familiar with is a bulb.

Think of a bulb of garlic–inside that bulb, there are many different cloves that are lumped together in a circular shape. It’s the same idea with bulb plants. After maturing, the bulb creates separate bulbs that can be taken off and used to start a new plant that will thrive on its own. These new plants (called offshoots) can be planted and flourish on their own.

How to know when to split your perennials

Each perennial plant is different, but on average, you should split your plants every 3-5 years (though some require splitting every year and others can go five without needing to be divided). Check with your local garden store or online resources to determine the best approach for each plant variety.

Other indicators that it’s time to split your perennials include when the plant:

  • Congests the garden
  • Covers more ground than usual
  • Stops flowering
  • Starts sprouting small shoots from the ground around the main plant stalk

When you split your perennials

Splitting can truly be done any time of year as long as the plants are well-watered after replanting. However, they tend to do best when they’re dormant, either in the late fall before the cold sets in or in early spring when they’re just showing signs of new life. The exception to this is spring-flowering perennials, which are best divided in the summer once they’ve started to fade. Again, your local gardening center or the University of Minnesota Extension are great resources for determining the best time of year to split your plants.

How to split your perennials

Splitting is very easy! Here are a few quick steps to successfully divide your plants.

  1. Dig up the plant. Use a shovel, trowel, or garden fork to dig up the entire plant (note that plants may have spread out or grown deeper than where you planted them, so be safe and dig a few inches around the stalk). Always call 811 before you dig to ensure underground utility lines can be marked.
  2. Carefully separate the bulbs, clumps, or roots. Brush off dirt and gently divide the plant. Depending on the plant, you may need a knife to separate the pieces, but many species can be gently divided by hand.
  3. Remove any dead bulbs. Toss bulbs or sections that are shriveled, soggy, or damaged.
  4. Replant the original parent plant and offshoots. Put the original plant back where it was (unless the parent bulb has died), and plant the offshoots at the same depth and distance recommended for the plant. Add some compost or nutrient-rich soil to the plants to give them a healthy boost.

Note that some plants can’t be replanted right away and may need to be dried out before replanting. Check online or with your garden center for your specific plants to give them their best shot at flourishing.

  1. Water and watch. Water the new plants well for a few weeks until you start to see new growth. Then, water on a regular schedule. Note that it may take a few years for the new plants to grow and flower at the same rate as the original plant.

If you don’t have any more space in your garden for your new offshoots, consider:

  • Planting offshoots in pots. Since it may take a year or two to grow and start flowering, putting the new plants in a pot is a good option to get them healthy.
  • Gifting them to friends, family and neighbors. Just like fruits, vegetables and even dough starters, your extra perennials can make great gifts and ensure that nothing is going to waste.
  • Donating them to your garden center, club, or local organization. If you run out of people in need of plants, call up local establishments or gardening centers and clubs to see if they’d like your offshoots.

Enjoy your garden

Splitting plants is easy to add to your spring lawn care routine. Gardening has great physical, mental and emotional benefits that help you stay healthy. Plus, having native plants or a pollinator garden helps the local ecosystem and planet while bringing beautiful butterflies and birds to your front door!

Having an eye-catching outdoor space adds value to your home's curb appeal, too. If you’d like advice on what kind of perennial plants would help maximize your yard, reach out today.

Revitalize your home this spring

/media/3891/spring-into-action-april-2024.jpg

Key Insights

  • Give your home a fresh start by getting it ready for the new season.
  • Declutter your space and give it a good spring cleaning.
  • Make small repairs, home maintenance updates and aesthetic changes.

Spring has sprung! Homeowners are encouraged to take on a few minor repairs, as well as a thorough cleaning, to give their space a fresh start and increase the curb appeal of their property.

Clear out clutter

The winter months might have caused clutter to build up in your home. Now is the time to purge and get organized. Throw away anything you don't need and store items you haven't used in a while or won't use during the warmer months of the year.

Establish routines and storage solutions for all areas of your home from your kitchen to kids’ spaces to help keep things orderly. It may feel like a daunting task, but clearing a home from clutter can open up space, save you money and reduce stress and will be well worth the effort.

Thoroughly clean

Once a home is free from the grasp of clutter, you can now give it a thorough cleaning. Don't skimp when it comes to a spring cleaning—you want to give your home a fresh start by airing it out, eliminating odors and giving everything a good scrub down.

Be sure to hit those out-of-sight-out-of-mind spots and move furniture and appliances to get every inch spick-and-span. It can be a lot of work, but on the bright side, it can double as a workout!

Paint faded rooms and cabinets

Another great way to add life to a home is to paint. Touching up a room is the perfect solution to make it look more appealing, whether you use paint, wallpaper or another wall accent like tile. Refinishing cabinets can completely change the look of a kitchen or bathroom at a low cost.

These updates can help your space feel larger and make your home better reflect your personal style (consider using some of the hottest colors for 2024). Just be sure to be realistic on how long these updates will take and if you should bring in a professional.

Make minor repairs

In addition to painting faded rooms and cabinets, it's also important to take on small repairs. Simple projects like fixing a door hinge will make you feel better about the state of your home this spring. It can also help prolong the life of your items or prevent larger issues from developing.

You can also use this opportunity to restock your home emergency kits and check that your smoke and carbon monoxide detectors have fresh batteries and your space is fire-safe. Now would also be a good time to tune up your HVAC and water system and clean or replace your filters.

Give yourself a fresh start

Decluttering, cleaning and making updates to your home can do wonders for your home's functionality and your enjoyment of your space. It’s also a great way to get your home ready to sell. If you’re finding that you need a bigger new beginning, reach out and see what’s on the spring market!

What to look for in a home inspection

/media/3881/home-inspection-march-2024-1.jpg

Key Insights

  • What happens during a home inspection, including what it costs, who pays for it and when it should take place
  • An experienced professional will know what to look for in a home inspection and can provide a report that outlines potential issues and fixes
  • What happens after the inspection–and how buyers can use it to their advantage

When buying a home, you may wonder what to expect during a home inspection. In our guide, you’ll find everything you need – including a home inspection checklist for buyers – to confidently move forward with your purchase.

What to look for in a home inspection: A buyer’s checklist

Find out why inspecting a house is important, how much it costs, who pays for it, and what happens during a home inspection. Our buyer home inspection checklist will help you understand what a good home inspection report should include as well as ways your REALTOR® will help you navigate the process.

Should I get a home inspection before buying a house?

Having a home inspected before buying can help you identify potential issues and avoid costly surprises. It can also help ensure you don’t overpay if the home has damage or defects that require substantial repairs.

According to the U.S. General Accounting Office, more than 85% of buyers request an inspection prior to signing a purchase agreement, so you can rest assured knowing you’re in good company when you ask for a home inspection for buyers. Sellers can also benefit by getting tips to pass their home inspection.

When is a home inspection done?

Real estate contracts in Minnesota and Wisconsin allow buyers to make their purchase contingent on a home inspection. Generally, this means the buyer and seller agree to have a professional home inspector conduct a thorough inspection of the property and prepare a report of their findings before the sale.

Depending on the findings, the buyer may have an opportunity to cancel the contract if they are concerned about the home’s conditions, or they may decide to negotiate possible repairs with the seller. Most importantly, the buyer will be able to proceed with a strong understanding of the condition of the property before they buy.

Who pays for a home inspection?

The homebuyer typically hires the home inspector. Your REALTOR can recommend someone they trust, or you can interview potential inspectors to get an idea of their relevant experience and obtain sample home inspection reports and client references.

How much is a home inspection?

The cost of a home inspection may vary and will be determined by the home inspector you hire. According to the U.S. Department of Housing and Urban Development, the range for a typical home inspection is between $300-$500. Some things that could impact the cost include the region where you’re buying, the size and age of the house, and the scope of the services you’re paying for.

What happens during a home inspection?

A home inspection is a professional evaluation of a property, and it’s intended to determine the property’s condition and reveal any potential safety concerns. During a typical home inspection – which lasts two to three hours – a licensed home inspector will walk around the property to assess the condition of the interior and exterior, including the structural, mechanical, plumbing and electrical systems. They will put together a comprehensive report that documents their findings, including big and small concerns, as well as potential fixes. You should always ask for their professional opinion about any problems they uncover.

Remember, a REALTOR is not a professional inspector and should not be relied upon in place of one. A professional home inspector will use their experience and training to identify things that might not be apparent to your REALTOR or the average person. What to look for when inspecting a house is much different from what you might look for at an open house or showing.

Four things to look for in a home inspection

Your professional home inspector can provide an overview of what to expect from a home inspection and will likely have a dedicated checklist when making their report. However, as a rule of thumb, you should expect their report to address structural, mechanical, electrical and plumbing systems in addition to interior features, exterior conditions, the roof, walls and foundation. Generally, they will focus on four main areas.

Structural

This can include exterior and interior features of a home where the inspector will look for things like evidence of moisture or water damage, decay, termites, stains, cracks, damage, sagging and other imperfections. They will likely examine:

  • Foundation, crawl spaces and exterior walls
  • Septic tank, if applicable
  • Windows and door frames
  • Siding, bricks, paint and other exterior features
  • Roof and gutters
  • Chimneys
  • Grading for drainage
  • Detached garages, sheds, decks and fences
  • Attic and insulation
  • Soffits and ceilings
  • Stairway treads, risers and railings

Mechanical

This is related to your home’s heating, ventilation and air conditioning systems, sometimes referred to as HVAC. It will be inspected to ensure there is no gas odor and that systems are clean and operate as expected. They will likely examine:

  • Furnace or boilers
  • Air conditioning or other cooling systems
  • Ventilation, including chimney flues and exhaust fans
  • Air filters
  • Ceiling fans
  • Smoke and carbon monoxide detectors

Electrical

When it comes to your electrical system, your inspector will likely be looking to ensure things are in good and safe working condition and meet current code and capacity requirements. They may examine:

  • Wiring
  • Service or electrical panels
  • Cables
  • Electrical splices
  • Lights and switches
  • Electrical outlets
  • Electric garage door openers

Plumbing

When it comes to your plumbing, your inspector will look for evidence of leaks, rust, issues with water pressure or temperature, clogged drains and any signs of water damage. They will likely inspect:

  • Pipes
  • Water heater
  • Sump pump
  • Toilets, tubs, sinks and showers
  • Drains
  • Garbage disposals

Additional inspection considerations before buying

There are some things a typical home inspection may not address depending on your location, property features or even the type of home financing you’re using. Your REALTOR can help you determine whether Truth in Housing or inflow/infiltration inspections are needed as well as whether your home should be inspected for pests. You may also need special evaluations done on features like swimming pools, jacuzzis and solar panels.

What should a home inspection report include?

A typical home inspection report will be 20-50 pages long–or even longer in some cases. A longer report doesn’t necessarily indicate a home with major problems; it could simply mean the inspector was thorough and identified many smaller issues that you could use in your negotiations with the seller.

A good inspector will walk you and your REALTOR through their findings, and they can give you their professional opinion when it comes to easy fixes versus major red flags and potential deal breakers.

Next steps after a home inspection

After you’ve had some time to digest the findings from your home inspection report, you and your REALTOR can discuss what comes next. Depending on the issues, you could use it to negotiate down the purchase price, you could request that the seller replace or repair major issues, or you could choose to walk away from the purchase altogether (provided you had a contingency). No matter what you decide, your REALTOR is in your corner and will help guide you through the process to ensure you move forward with confidence.

Ready for help in your home buying journey?

Buying your first (or next) home is an exciting time, and you want to make sure you have all the information and support you need to make a good decision and an informed purchase. Reach out and we’ll determine the best course of action to secure the right home with the help of a home inspection for buyers.

Ideas for making your home feel bigger

/media/3882/larger-space-illusion-march-2024-1.jpg

Key Insights

  • Use a monochromatic color scheme for continuity between room boundaries.
  • Play with scale when furnishing your home.
  • Incorporate light–both natural and artificial–to highlight the space you have.
  • Rely on decorating best practices that draw the eye to any additional room you have.
  • Declutter and optimize blank space to make the most of your square footage.

Big, open spaces are appealing when it comes to homes. But even if you’re short on space, you can still make your home feel open and roomy. Whether you’re trying to make the most of the room you have or looking to appeal to buyers, there are a variety of ways to create the feeling of a spacious home, even if you’re working with a closed floor plan. Try incorporating these ideas to maximize your square footage.

Go for a monochromatic color scheme

White is especially good for brightening up a room and making it appear larger by reflecting light better for a more open, spacious feel, but neutrals are also a great choice (especially when staging a home). However, a unified dark space can also work by blurring room boundaries. This is also true when incorporating tile into a space–smaller tiles require more grout that can visually break up a space, while bigger tiles create a more seamless look.

If you have an open-concept home, think about using the same flooring and paint colors throughout to create connection and continuous space instead of visually chopping it up with textiles and colors.

Rethink your furniture and play with scale

Furniture takes up the majority of your space. Instead of fighting it, play with scale when it comes to your furniture, and balance items. For instance, have a king-sized bed, but get rid of a footboard and choose a tall headboard to draw the eye up since there’s less horizontal free space.

Consider moving furniture away from the walls so it doesn’t feel like you’re at a loss for room. Opt for pieces that are transparent or have slim legs and forgo pieces that are clunky or have skirts to keep the eye from going to the ground. The goal is to allow the eye to travel further around the room with limited interruption.

Use light to highlight the space you have

Be sure to remove anything that may be blocking natural light sources (furniture, decor, overgrown trees, etc.) and keep windows clean. Install lower and wider windows to optimize this effect, keeping in mind that “green” home improvements may be eligible for tax deductions.

For spaces without natural light, layer your lighting using multiple sources (overhead, sconces, lamps, under cabinet lighting, spotlights, etc.) to brighten up any dark corners and show every inch of your space. When choosing your light bulbs, look for cool lighting that’s whiter and brighter to better highlight the room. You can also place mirrors or use glossy surfaces opposite to bounce and reflect light around the room.

Rely on decorating best practices

A keen eye for decor can make all the difference! Utilize simple decorating best practices that help guide the eye and give the feeling of a spacious home.

  • Hang drapes closer to the ceiling and past the window casing to draw the eyes up and out.
  • Paint the ceiling the same as the walls to visually expand the space.
  • Use wide planks of flooring or tile to help accentuate the length and width of a room.
  • Frame furniture with an appropriately sized rug.
  • Point lights up to add vertical height.
  • Incorporate glass to break down visual barriers while also letting in extra light.

Declutter and create blank space

Get rid of any clutter and add more real estate to your home. Remove anything that blocks a visual or physical pathway and go for one or two pieces of larger art to make the walls feel larger and play with scale. Having too much on the walls can make your home look smaller than it actually is. Instead, create a focal point and allow that to shine.

If you are dealing with clutter you can’t get rid of, consider hidden storage options like an ottoman that doubles as a blanket box, or eliminate the need for bookshelves and other bulky furniture with wall shelves that draw the eye up and toward non-cluttered areas. If you do opt for shelving, streamline your items and allow for blank space to highlight key decor. When storage spaces are packed, it gives the sense of not having enough room and makes your home look smaller.

Make the most of what you have

Making some small changes can have a huge impact on how big your home feels. By incorporating these tips and ideas, you’ll be able to increase the feeling of square footage without adding an inch of space.

For more ideas on how to best stage your home for showings and make the most of the home you have, reach out today.

Understanding home equity: Everything you need to know

/media/3880/maximize-home-equity-march-2024.jpg

Key insights:

  • The average homeowner gained $20,000 in home equity by the end of Q3 2023.
  • An increase in home equity could impact your mortgage insurance.
  • Home equity can be used to fund a number of life stages — from buying or building a new home to retirement, home improvement projects and beyond.
  • Borrowers should understand how their home equity is calculated and what the best options are for tapping into it.

You may have seen the headlines earlier this year: Due to fast-rising home prices, the average homeowner gained more than $20,000 in home equity through the end of Q3 2023. That represents a 6.8% jump in home equity compared to the prior year.

But despite these gains, it’s harder than ever for some homeowners to make ends meet. While everyone’s financial situation is different and we can’t make specific recommendations on whether you should take advantage of your home equity, it’s important that homeowners understand the power and options they have in today’s market environment.

Let’s dive into what home equity is and what choices homeowners with equity can make if desired.

What is home equity?

In the simplest terms, home equity is the difference between what you owe on your mortgage and your home’s current market value. If you owe $100,000 on your mortgage and your home is worth $400,000, then you have 75% home equity. Conversely, if you have a remaining mortgage balance of $300,000 on your $400,000 house, you have 25% home equity.

Your home’s equity rises when:

  • You pay off more of your mortgage (and your home value remains steady).
  • Market conditions raise your home’s value.

The housing market can be a major contributor to homeowners’ gains in home equity: when home prices go up, so does the amount of equity you have in your home because your home equity is based on how much you owe on your home’s value at the time you bought it and what it’s worth today.

The market value of a house can be impacted by many factors, but it mostly boils down to supply and demand. A rapid jump in home sales creates higher sales prices, leading to higher home values and a home equity increase for homeowners. As was the case during the past few years, the number of homes on the market has dropped and prices have increased due to the competitive market, which has also led to an increase in selling prices and therefore an increase in home equity.

What happens to my mortgage insurance when my equity rises?

Two groups typically pay mortgage insurance to their lender:

  • All borrowers with FHA loans
  • Conventional loan borrowers who put down less than 20% at closing

Mortgage insurance payments help lenders offset the risk of lending to less-than-perfect loan candidates, but that risk is diminished when the home’s equity begins to rise. Once the borrower’s home equity reaches 20% of the original purchase price, their mortgage insurance may be canceled for the rest of the loan term.

What can I do with my newly accumulated home equity?

There are a multitude of options available for homeowners who want or need to leverage their home’s equity. Below is a list of the most common paths for using or tapping into home equity. Remember, your financial situation is unique and you should speak with your financial advisor and lender to determine your ideal path.*

Sell and pocket a profit

The easiest-to-understand way to benefit from your home’s equity is to sell your home and reap the profits. If you owe just $50,000 on your $450,000 house, for example, then nearly $400,000 in home equity will be yours as you leave the closing table (less your closing and other costs associated with the transaction). Note: This does not account for capital gains taxes, which may or may not apply to your situation.

You can use that net profit to fund your next chapter — whether that be a new property, a retirement community or an RV that will take you across the country in your golden years.

Apply for a reverse mortgage

Homeowners who are 62+ and have most of their wealth tied up in their home may consider a reverse mortgage. In a reverse mortgage, the homeowner stops paying their monthly mortgage payments and their lender gives them a monthly or lump sum based on their home’s equity. As you would expect, this agreement will diminish the homeowner’s equity over time, and increase their debt; the homeowner will then pay off the lender with the profits of their eventual home sale.

Reverse mortgages can be beneficial for homeowners who wish to age in place, but who don’t have the savings or investments to fund their retirement.

Borrowing against your equity

Last, there are three other ways to borrow against your home’s equity. Each of them has different terms and benefits.

  • Fixed-rate home equity loan: Homeowners can tap into their home equity to cash out a single lump-sum payment. The loan has a set interest rate and a typical payment term of between 5-15 years.
  • Home equity line of credit (HELOC):Homeowners can tap their home equity as needed in a revolving line of credit that is akin to a credit card. Borrowers have a “draw” period when they can take out the money, followed by their repayment period. HELOCs usually have variable interest rates that change over time, though some lenders are beginning to offer fixed-rate HELOCs.
  • Cash-out refinance:Think of a cash-out refinance as a two-step process. First, borrowers replace their existing mortgage loan with a new loan that exceeds the amount they owe on the home. Next, they receive a lump sum payment that represents the difference between their home’s value and the amount they’ve borrowed.

Whether it’s to consolidate or pay off debt, make home improvements or fund other needs, these options can be a helpful solution for the right borrower.

Need help calculating your home equity?

Big financial decisions should be made carefully, and our experienced team can offer the insights you need to make decisions about your home’s equity. Reach out or contact a mortgage consultant for private, professional assistance.

*Prosperity Home Mortgage, LLC, Prosperity Home Mortgage, LLC dba Edina Realty Mortgage, and HomeServices Lending, LLC are not financial advisors and cannot and are not offering financial advice. Please contact your financial advisor to discuss whether a home equity line of credit fits your overall financial goals.

Home equity line of credit may not be the right option for all borrowers. Not all borrowers will qualify. Contact your mortgage consultant to discuss each of the financing options available to you. Home equity lines of credit provided by third party. Some and/or all qualifying criteria may be set by an independent third party. Borrowers will be subject to qualification and must satisfy all underwriting requirements and conditions.

By refinancing an existing loan, your total finance charges may be higher over the life of the loan.

Edina Realty Mortgage is an affiliate of Edina Realty. See Affiliated Business Arrangement Disclosure Statement

Prosperity Home Mortgage, LLC may operate as Prosperity Home Mortgage, LLC dba Edina Realty Mortgage in Minnesota and Wisconsin. ©2024 Prosperity Home Mortgage, LLC dba Edina Realty Mortgage. (877) 275-1762. 3060 Williams Drive, Suite 600, Fairfax, VA 22031. All first mortgage products are provided by Prosperity Home Mortgage, LLC. Not all mortgage products may be available in all areas. Not all borrowers will qualify. NMLS ID #75164 (For licensing information go to: NMLS Consumer Access at http://www.nmlsconsumeraccess.org/) Licensed by the Department of Financial Protection and Innovation under the California Residential Mortgage Lending Act. Licensed by the Delaware State Bank Commissioner. Georgia Residential Mortgage Licensee. Massachusetts Mortgage Lender and Mortgage Broker MC75164. Licensed by the NJ Department of Banking and Insurance. Licensed Mortgage Banker-NYS Department of Financial Services. Rhode Island Licensed Lender. Rhode Island Licensed Loan Broker. Rhode Island Licensed Third-Party Loan Servicer. Also licensed in AK, AL, AR, AZ, CO, CT, DC, FL, ID, IL, IN, KS, KY, LA, MD, ME, MI, MN, MO, MS, MT, NC, ND, NE, NH, NM, NV, OH, OK, OR, PA, SC, SD, TN, TX, UT, VA, VT, WA, WI, WV and WY.

Five goals to set when you plan to sell your home

/media/3867/sell-my-home-declutter-january-2024-1.jpg

Key Insights

  • Breaking down the to-do list of getting your house market-ready makes it more manageable and less stressful.
  • Decluttering, organizing and cleaning your space are essential to selling.
  • Begin working on DIY projects and home updates to get your home ready to list.
  • Work with a licensed REALTOR® early on in the process to get the most out of their selling expertise.

If selling your house is on the to-do list this year, you may be overwhelmed when you think about all the work that goes into getting it ready for the market. By breaking down your to-do list into definitive goals, you can make the process more manageable and remove some of the stress that comes with selling a home. It can also help build momentum and space out your tasks so you’re not trying to take on too much all that once.

Make these goals part of your New Year’s resolutions to ensure your home is ready for showings, and turn making your home seller-ready into bite-size, manageable goals.

Goal 1: Declutter

Decluttering can benefit your life in a multitude of ways. It helps you get organized, improves mental health, removes chaos and allows you to appreciate what you have. Selling items no longer needed can add some extra cash to your bank account (did you add “start saving more” to your 2024 resolutions?). You could also donate items for an extra-good feeling of helping those in need.

There are plenty of different ways to tackle decluttering:

  • KonMari: Keeping only the things that bring you joy.
  • Swedish Death Cleaning: Simplifying your life by removing things you no longer need.
  • The Four Box method: Turing decluttering into four options for each item you own—should it be donated, trashed, relocated, or kept?
  • 12-12-12 challenge: Filling a quota by finding 12 things to donate, 12 to toss and 12 to put away.

It doesn’t really matter how you declutter; the most important thing is finding a method that works best for you and your family. It’s also a good step to take when estate planning and taking stock of assets.

Goal 2: Get organized

Now that you’ve removed all the “extras,” it’s time to get everything back in order. Not only will this make everyday living easier and keep your household running smoothly, but it will also be a huge benefit for when you move. Just like decluttering, there are plenty of ways to organize your home, and the most important part is finding what works for you.

This step might involve a small investment if you need to buy bins, containers or other storage solutions, but the good news is that there is a huge market with a variety of price points and aesthetic options out there to fit your needs.

Goal 3: Deep clean the house

There are probably a couple of spaces in your home that haven’t been given the once-over in a while (when was the last time you washed your washing machine or cleaned behind the fridge?). Take a weekend for a “spring” cleaning, or create a hit list to accomplish during the week and get those out-of-sight, out-of-mind areas spick and span. (Plus, if your New Year’s resolutions include being more active, you’ll be burning calories as you clean!) Keep your space fresh and clean by creating a weekly cleaning schedule and help prevent last-minute panic cleans in the future.

Then, mark your calendar to tackle those spots again every couple of months to keep them under control. While your calendar is out, consider scheduling some maintenance checks on your big-ticket home items like your furnace, HVAC system and water heater. If you have any concerns about your roof and windows or installation, now would be a good time to check them out to avoid costly surprises when the time comes to sell.

Goal 4: Tackle DIY projects

Every home has a few dings, scrapes or design flaws, but those small imperfections can appear more glaring to potential buyers. Make a list of all the little annoyances your home has and repair as many as you can. You’d be surprised how much of a difference minor updates like painting a room or updating your mudroom can make—not just in your resale value, but in how much you’ll enjoy your home while you’re still in it! Just keep in mind how any aesthetic changes can impact your home sale—while your favorite color might be pink, you might want to stick to a neutral paint color for staging and selling purposes.

For bigger projects, you may need to hire a contractor, plumber, electrician or other tradesperson. If you’re considering updating larger areas like your kitchen or bathroom, consider what your return on investment will be when you sell and if the work you’ll put in will pay off in the end.

Goal 5: Find a REALTOR®

Some things you know you need to do on your own, like replacing a stained carpet or cleaning out the garage. But there are going to be plenty of things you won’t necessarily know to do, or how to do them.

That’s where the expertise of a REALTOR comes in. They can guide you on practical matters like what plants will create the best curb appeal, as well as guide you through the home selling process and provide you with a comprehensive checklist for getting your home ready to sell.

If you wait to find an agent right when you want to sell, you’ll be missing out on all their guidance and pre-listing work they can provide to help improve your odds of getting a quicker close at a higher value.

Ready to start accomplishing these goals? Reach out today.

Status Definitions

For sale: Properties which are available for showings and purchase

Active contingent: Properties which are available for showing but are under contract with another buyer

Pending: Properties which are under contract with a buyer and are no longer available for showings

Sold: Properties on which the sale has closed.

Coming soon: Properties which will be on the market soon and are not available for showings.

Contingent and Pending statuses may not be available for all listings